본 포스트는 Visual Studio에서 warning level을 설정하는 방법을 설명한다.
Warning level을 높게 설정함으로써, 코드의 이상한 부분을 놓치지 않고 warning을 띄움에 따라 에러 없는 코드를 작성할 수 있다.
1. Solution explorer에서 프로젝트를 우클릭하고 Properties에 들어간다.

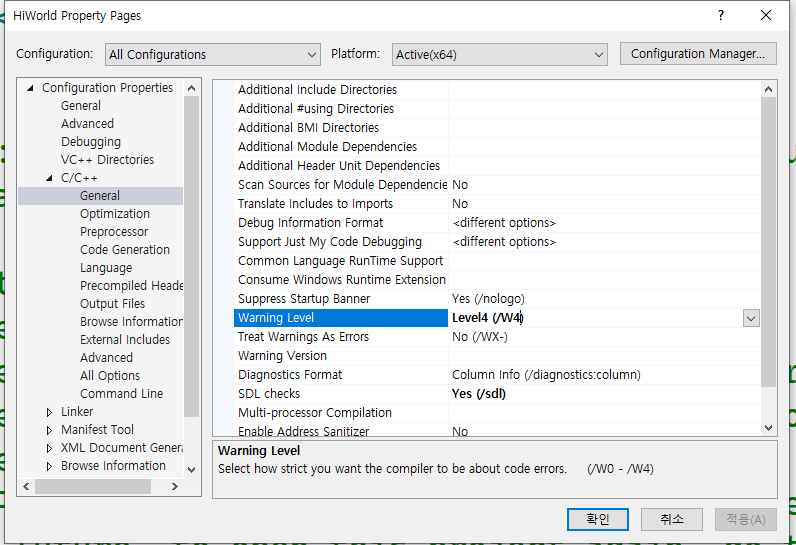
2. All Configurations - C/C++ - General 탭에서 Warning Level을 Level4로 맞춰준다.
원래 Level3로 되어있을 것이다.
3. All Configurations - C/C++ - Command Line 탭에서 Additional Options에 /w44365를 추가해준다.
이는 signed/unsigned conversion warning을 활성화 해준다.

4. Header는 level3로 compile하기.
All Configurations - C/C++ - External Includes 탭에서 External header Warning Level을 Level3로 설정해준다. 이는 compiler로 하여금 standard library header를 level 3로 compile하도록 해준다. 아까 warning level을 level 4로 설정해뒀기 때문에 이를 설정해주지 않으면 header를 compile 때도 warning을 마구 띄워준다.

5. (선택사항) Warning을 Error로 간주하는 방법
All Configurations - C/C++ - General 탭에서 Treat Warnings As Errors를 No에서 Yes로 바꿔준다.

'Visual Studio' 카테고리의 다른 글
| Visual Studio SDK, WDK 설치 방법 (0) | 2024.02.25 |
|---|---|
| Visual Studio C++ 표준 설정법 (0) | 2024.02.24 |
| Visual Studio 언어 변경 방법 (0) | 2024.02.19 |
| Visual Studio Compiler extensions 끄는 방법 (1) | 2024.02.19 |
| Visual Studio 2022 튜토리얼 (0) | 2024.02.19 |


